Average Reviews:

(More customer reviews)This is a review of the 3g lensbaby that has all of the info in I wish I had before I bought mine. If I had this info I would still have bought mine, but I might have waited a little.
First, a little about what I take pictures of. If all you care about is the lens itself, skip this paragraph. I shoot anything and everything. I have a studio and I hire models for some jobs, I also do weddings, seniors, sports, concerts, landscapes, and some menu/catalog advertisements as well. Thus, I have a large range of interest, and lots of lenses and equipment for various genres.
I bought this lens figuring it would be more of a novelty toy than a daily user kind of lens, and it has been just that. I recommend going into things with that in mind for your budgeting the cost. I have seen many images by other photographers that were obviously done by a lensbaby and I felt that the effect wasn't always good or it was overdone. However, I've seen other images I liked and learned later a lensbaby was used. This truly artistic use was what made me finally get one - I wanted to push myself to use it so it wasn't so obvious but have the effect be worth it.
Before I bought one I read that this was an f/2.8 lens with some weird magnetic aperture ring changer. In my mind I thought you slipped the rings in behind the lens like a traditional lens ( light -> lens -> aperture -> film ) but now that I have one I can tell you that the aperture rings actually go in from the outside and live in front of the lens elements. Not a biggie, but something you should know. Although you can change things with the supplied magnet, I haven't done a lot of it as I find it to be a little awkward and I like the small "sweet spot" that you get with shooting more open.
Also, once I got the lens I found out that f/2.8 is the largest aperture ring. You can use the lens itself, without a ring, and get f/2.0. In theory that is. You have to account for bellows factor and other things that a regular 35mm user may not be used to. So, if you're using a light meter you may have to go a half or a third of a stop slower on the shutter to get a proper exposure over what your meter thinks based on the f-stop you think you're shooting at.
Also, being f/2.0 makes this lens one of the fastest I have, and I already loved the nice blur I get from my Nikon 50mm f/1.8. So, I look at the lensbaby much like I look at that Nikon lens, only the lensbaby lets me bend the blur, at the cost of AF and metering.
Next, I want to talk about lens operation. Like you I saw all of the pictures with the three pins sticking out and at first it scared me as I recently had three pins inserted in my wrist. I didn't know how these lens pins really worked and that lack of knowledge led me to not get a lens for longer period of time. I wish there was a little demo video somewhere since seeing it in action makes all the difference. So, let me tell you how the thing works even if I don't have a video.
The lens has two modes: locked and unlocked. In unlocked the thing bends and flexes easily to your pushing and pulling. You don't notice the pins at all as you freely move the bellows. You can bellow it straight out and in (telescoping), left / right, up / down, as well as combination of in/up and out/left, all to your heart's content.I recommend that when doing this you should put the outer manual focus ring in the middle of its travel. Once you get your "sweet spot" lined up in the general direction (for example let's say "left and out") you push a single button located on the topside, in the area of your shutter release button on your camera body. Press that button and immediately the lens locks in. It comes with a nice feeling of a sturdy spring snap locking it all together.
To unlock the lens there are two little knob-like things on the opposite side of the lens body that you pinch together. This serves to open the grip on the three pins and cocks the spring; ready to snap when you hit the button described above.
Personally, I recommend setting the sweet spot only slightly off from center. The further you bend it, the more it blurs things on the other side, and this blur can be distracting depending on the background. Following the rule of thirds you wouldn't want to be 50% between center and the edge anyway for your shot composition.
Now that you have locked things in (or locked, unlocked, moved, locked again) you can use the outer focus ring, similar to those on lenses you already know and love, and dial in the exact focus in your "sweet spot." Above I recommended leaving it in the middle position so that now you have the full range front and back to play with.
Changing the focus (sometimes I have to move the camera relative to the subject) can move the sweet spot around slightly. No worries, the three pins are actually tapped (they have screw flanges running their entire length) and if you turn them (they have handy little black plastic knob things on each end) you can slowly and slightly adjust the lens bellows angle, dialing in your sweet spot again.
(Warning: math speak in this paragraph) In my mind I picture it like two planes in space. The one plane is the film (or digital sensor) in your camera. The other plane is what is in focus. For a normal lens this plane runs parallel to your film and you move it in and out with the focus and lens zoom. Anything that touches this plane is rendered in focus on the parallel plane of your film. With a lensbaby you still have the film plane, but as you bend the bellows you move the focus plane around with it so it no longer runs parallel to the film. The film can still only render things in focus that lie on a focus plane parallel with it, so the "sweet spot" is the intersection of a plane running parallel to the film and the adjusted bellows plane.
I have not used any other lensbaby products before I bought one. I understand that the earlier versions, which lack the locking pins, just spring all around and you have to hand hold the lens position. That would drive me insane so I am glad I spent the extra money for the 3g model over a cheaper used 2g or earlier model.
Even so, I still consider this more of a toy that I doubt will see much use in for-pay or day-to-day photo work, but I will continue to try to use it in ways that aren't obviously done with a lensbaby, and I promise to not over use it, as fun as it may be at times.
It does what it promises, but I find for the money if you don't have a nice fast prime lens already then the lensbaby should probably be a later investment for you since you'll get more from a fast prime lens (I mentioned the Nikon 50mm f/1.8D AF Nikkor Lens for Nikon Digital SLR Cameras earlier) than you would from a lensbaby.
The lens is like some exotic filter or plug-in for Photoshop: it does what it says, is often over used or not used when it was really necessary, something nice to have if it is needed, but not necessarily for everyone. Having it will not make you Sally Mann, but it is definitely a fine artistic tool that can be incorporated into your personal style of photography.
I recommend this for those who can picture in their mind what they would use it for, already own some fast lenses in or around this focal length, and who will also promise to not over use it.
Click Here to see more reviews about:
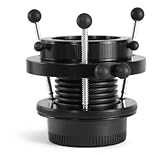
Lensbaby 3G Nikon F Mount SLR Camera Lens (LB3GN)The Lensbaby 3G SLR lens for Nikon SLR Cameras combines an old-fashioned bellows camera with an up-tight tilt-shift lens, and the 3G allows photographers to lock the Lensbaby in a desired bent position simply by pressing a button. Then, using a traditional barrel focus mechanism, you can do fine focusing and precisely place the sweet spot of sharp focus before pressing the shutter release. Lensbaby selective focus SLR camera lenses take photos with one area in sharp focus, with that sweet spot surrounded by graduated blur. You can move the sweet spot of sharp focus anywhere in the photo by bending the flexible lens tubing.
The Lensbaby 3G features the same low dispersion, high refractive index, multi-coated optical glass doublet and the same flexible tubing as Lensbaby 2.0, but adds three focusing rails that emerge from the camera mount and pass through the focusing collar. A trigger button on the focusing collar releases three pins that engage the focusing rails and lock Lensbaby 3G in a bent position. Once Lensbaby 3G is locked into place, additional fine focus can be achieved by turning the barrel focusing ring, which moves the optic in and out like a normal manual focus lens. Also, in the locked position, you can make small adjustments to the placement of the sweet spot of focus by turning any combination of the three focusing rails.
While the Lensbaby 2.0 is a good choice for fluid, photojournalistic shots, the Lensbaby 3G plays well with pros who require precise focusing, complete control, and repeatability. Other features include:
Focal length: About 50mm
Minimum focus: 12 inches
Apertures: f2, f2.8, f4, f5.6, f8, f11, f16, f22
Aperture type: Interchangeable levitating aperture disks
Automatic light metering is possible by shooting in aperture priority mode for many digital and film SLR camera bodies except certain Nikon bodies including the D50, D70, D70S, D80, D100, N50, N55, N65, N70, N75, N80
What's in the Box Lensbaby 3G Selective Focus SLR Lens, metal lens cap, aperture discs, disc removal tool

Click here for more information about Lensbaby 3G Nikon F Mount SLR Camera Lens (LB3GN)